I remember being at an SPL competition in Florida back in ’12. A guy pulled up in a van with sixteen 15-inch subs. It was a monster. But every time the bass dropped, his voltage plummeted from 15V to 11V. I looked in his back, and it was a nightmare: dozens of 0-gauge cables crisscrossing like a bowl of blue and red spaghetti.
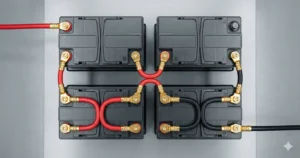
The heat coming off those cables was enough to cook a steak. He had so many “points of failure” and so much cumulative resistance that his amplifiers were starving for current. That same day, another competitor had a similar setup, but instead of cables, he had thick, gleaming Copper Busbars connecting his bank of Lithium Batteries. His voltage? Rock solid at 14.8V the entire run.
That was the day I stopped thinking of busbars as a “luxury” and started seeing them as a requirement. If you’re pushing north of 5,000 watts, cables aren’t just inefficient—they are a bottleneck. In this deep dive, I’m going to explain the engineering behind the bar and why it’s the only way to build a world-class Car Audio System.
What Exactly is a Copper Busbar?
At its simplest, a Copper Busbar is a solid strip of metal used for high-current power distribution. In the world of High Power Audio, we don’t just use any metal. We use C110 Copper, which is 99.9% pure copper. This material is the gold standard because of its incredible Electrical Conductivity.
When you have multiple amplifiers and multiple batteries, connecting them with traditional cables requires dozens of ring terminals, bolts, and washers. Every single one of those connections is a “choke point” where resistance can build up. A busbar replaces that mess with a single, solid conductor that allows current to flow freely across a massive surface area.
The Physics of Conductivity: Why Copper Rules
Not all conductors are created equal. While aluminum busbars exist, they have significantly higher resistance than copper. In a high-amperage environment, even a tiny increase in resistance leads to a massive Voltage Drop.
In this formula, ρ (rho) is the resistivity of the material. For copper, this number is incredibly low. L is the length, and A is the cross-sectional area. By using a thick Copper Busbar, we are dramatically increasing “A,” which brings the total resistance “R” as close to zero as physically possible.
Current Density: Cables vs. Solid Bars
Stranded OFC Cable is great for flexibility, but it has a weakness: “air gaps” between the strands. Even a 0-gauge cable is a collection of tiny wires. A solid copper bar has 100% “fill density.”
Because of this, a busbar can handle much higher Current Density without overheating. When an amplifier demands 400 Amps for a sub-bass note, the busbar provides a “highway” with zero traffic jams. This “electrical rigidity” ensures that the voltage doesn’t “sag” during the most demanding parts of a track.
The Lithium Revolution: Busbars are Mandatory
With the rise of Lithium Batteries (LTO and LiFePO4) in car audio, busbars have become essential. Lithium cells can discharge current at astronomical rates. To tap into that power, you need a connection that can handle it.
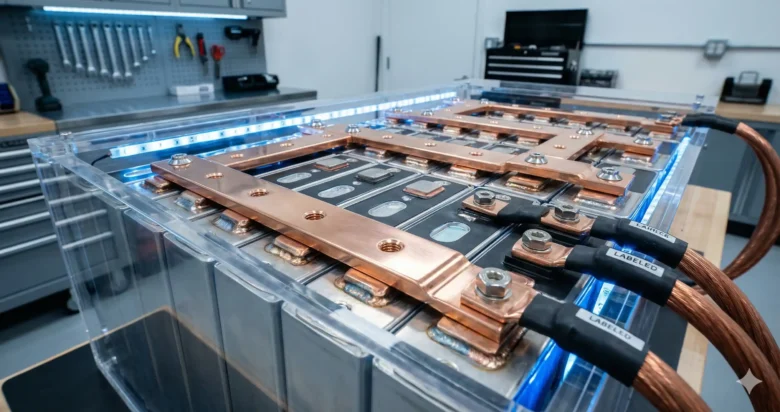
Most lithium banks are built using individual cells that must be linked in series or parallel. Using cables to link 20 or 30 cells is impossible and dangerous. A custom-machined Copper Busbar allows you to bolt directly to the battery terminals, creating a low-resistance “manifold” for your power.
- LTO Cells: Require precise busbars to handle their massive 10C+ discharge rates.
- LiFePO4 Units: Benefit from busbars to maintain cell balance and prevent heat buildup.
- Safety: Solid bars don’t “wiggle” or fray like wires, reducing the risk of a catastrophic short circuit.
Thermal Management: The Heat Sink Effect
One often overlooked benefit of the Copper Busbar is its Thermal Mass. When electricity flows through a conductor, it generates heat.
Because a busbar has so much more physical mass than a wire, it acts as a heat sink. It absorbs the thermal energy generated by the current and dissipates it into the surrounding air. This keeps your Battery Bank terminals cool, protecting the internal seals of your batteries and the life of your amplifiers.
DIY Fabrication vs. CNC Machined Bars
Should you make your own or buy them? As an engineer, I love a good DIY project, but there are rules.
The DIY Route:
If you buy copper flat stock, you need to be precise.
- C110 Grade: Ensure you are buying electrical grade copper, not decorative “architectural” copper.
- Drilling/Tapping: Use a drill press. Hand-drilling leads to loose bolts and high Contact Resistance.
- Smoothing: The surface must be perfectly flat. Any burrs or ridges will reduce the contact patch.
The CNC Machined Route:
Professional busbars are cut using CNC machines for perfect tolerances. They often come with “pre-tapped” holes for 1/0 AWG lugs, making the final install look like a piece of art. This is the preferred method for show-quality Car Audio builds.
Anti-Corrosion and Surface Prep: The Secret Sauce
Copper is an amazing conductor, but it has one enemy: Oxygen. Over time, copper will develop a layer of oxidation (that green or brown patina). Oxidation is a terrible conductor.
To prevent this, pros use a few tricks:
- Tin Plating: Some high-end busbars are “tinned.” This creates a silver look that is 100% resistant to oxidation.
- Anti-Oxidant Paste (No-Ox): Before bolting a lug to a busbar, apply a thin layer of conductive paste. This seals the connection from air and moisture.
- Sand and Clean: Always scuff the contact points with fine-grit sandpaper and clean with isopropyl alcohol before final assembly.
Eliminating the “Spaghetti Mess”
Beyond physics, there is the operational side. A system with five amplifiers needs a lot of power and ground runs.
- With Cables: You need multiple distribution blocks, which adds more connections and more points of failure.
- With Busbars: The busbar is the distribution block. You simply tap a hole and bolt your 1/0 gauge lug directly to it.
This level of organization makes troubleshooting a breeze. If you have a bad ground, you don’t have to trace 50 wires; you just check the main ground bar.
Safety and Short Circuit Prevention
High-current busbars are powerful and dangerous. If a wrench falls across a positive and negative bar, the resulting arc can melt the tool and potentially cause an explosion.
When engineering your system:
- Use Insulators: Mount your busbars on non-conductive materials like HDPE or Acrylic.
- Acrylic Covers: Always build a clear plexiglass cover over your busbars. This allows you to show off the “bling” while protecting the system from accidental shorts.
- Fusing: Even with busbars, every run to an amplifier must be fused. The busbar is the “source,” and the fuses protect the “branches.”
Conclusion: Engineering Your Way to the Podium
In the world of High Power Audio, you are only as strong as your weakest link. If you are still relying on bundles of 0-gauge wire to carry 500+ Amps of current, you are leaving decibels—and reliability—on the table.
Copper Busbars provide the lowest possible resistance, the best thermal management, and the cleanest installation possible. They turn your car from a hobbyist’s project into a professional-grade power station. If you want your system to be “Old School Reliable” but “High Performance” capable, it’s time to put down the wire cutters and pick up the copper bars.
FAQ:
1. Can I use Aluminum busbars to save money? You can, but aluminum has about 61% of the conductivity of copper. To get the same performance, your aluminum bar would need to be much thicker. Additionally, aluminum and copper don’t like to touch (galvanic corrosion), so if you use copper lugs on an aluminum bar, you must use a specialized joint compound.
2. How thick should my busbar be? A general rule of thumb for Car Audio is that a 1″ x 1/4″ copper bar can safely handle up to 600-800 Amps in short bursts. For competition “burps” (3-second runs), you can push it further, but for daily “demo” use, keep the current density conservative to avoid heat.
3. Does the shape of the busbar matter? In DC applications (like car audio), the cross-sectional area is the most important factor. However, for “transient” response (quick hits), a wider, thinner bar is technically slightly better than a square bar of the same area due to the way current travels on the surface, though the difference is negligible at 12V.