If you are pushing 1000W, 2000W, or more through your 12-inch subwoofers, you know the feeling of the earth shaking. But if you also hear a weird “clattering” or “humming” coming from your trunk, your box is failing you. Internal vibration, or “box flex,” is the silent killer of great car audio systems. It doesn’t just sound cheap; it actually steals energy that should be going into your bass, turning your high-end equipment into a noisy vibration machine. (96 words)
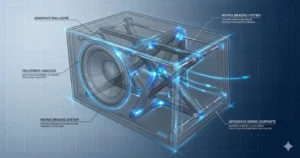
Building a high-power system requires more than just a big amp; it requires an enclosure that acts like a stone fortress. When the walls of your box move, they create waves that cancel out the sound coming from your subwoofer, a nightmare known as phase cancellation. As your “brother” in this hobby, I’ve seen incredible subs ruined by thin wood and weak joints. Fixing these vibrations isn’t just about sound quality—it is about making sure your box doesn’t literally shake itself to pieces under extreme pressure. (98 words)
You don’t have to settle for a rattling system that sounds like a loose pile of wood in your trunk. By mastering a few professional bracing techniques and learning how to treat your enclosure like a performance part, you can achieve that clean, terrifyingly deep bass you’ve always wanted. We’ve compiled the ultimate guide to eliminating box flex so your sub can finally perform at its full potential. Stop wasting power and start building for total structural rigidity right now. Check the details.
How to Eliminate Internal Vibrations in Car Audio Speaker Boxes: The High-Power Build Guide
Listen, man, if you’re running a monster system with over 1000W RMS, you aren’t playing in the amateur leagues anymore. At this power level, air pressure inside the enclosure is measured in pounds, not just sound. If your box isn’t built like a tank, it’s going to “balloon”—the walls will physically flex in and out. This “box flex” is essentially a leak that you can’t plug with silicone. It eats your decibels and adds a nasty, distorted character to your music.
Let’s get into the “brotherly” advice on how to kill those vibrations for good and turn your enclosure into a rock-solid bass weapon.
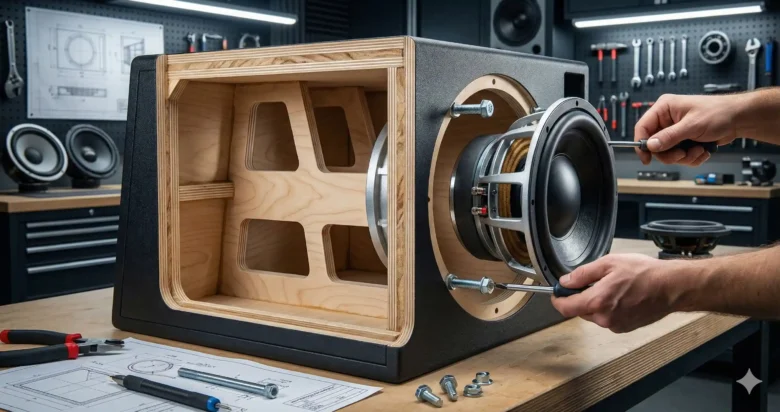
The Foundation: The Double Baffle Rule
The front baffle—the board your subwoofer actually screws into—is the most stressed part of the entire car. When that 12-inch sub moves forward, it’s trying to push itself out of the box; when it moves back, it’s pulling the wood with it.
If you’re using a single layer of 3/4″ MDF for a high-power sub, it will flex. The Fix: You need a Double Baffle. Glue two layers of 3/4″ MDF or Birch together to create a 1.5-inch thick mounting surface. This added mass stops the speaker from “rocking” and ensures that every millimeter of cone movement translates into pure sound pressure, not wood movement.
Structural Bracing: Window Bracing vs. Dowels
Think of bracing as the skeleton of your box. You want to connect the large, flat panels of the box so they can’t vibrate independently.
- Window Bracing: This is the gold standard. You take a solid sheet of MDF that fits inside the box and cut large “windows” out of it. This creates a frame that supports all four sides of the box while allowing air to flow freely. It adds incredible rigidity without taking up too much internal volume.
- Dowel Bracing: If you’re working with a tight space, using 1-inch or 1.5-inch wooden dowels to connect the front to back or side-to-side walls is a great “hack.” It creates a tension point that kills the resonance of the panel.
[Internal Link: See our guide on calculating box volume with bracing]
The Resin Trick: Hardening the Internal Walls
Here is a pro tip that the “big dogs” in SPL competitions use: Fiberglass Resin. Even the densest MDF has a certain amount of porosity and “give.” By painting the interior of your box with a thick coat of polyester or epoxy resin, you do two things:
- Seal the pores: It makes the box 100% airtight, which is crucial for high-power subs.
- Stiffen the surface: The resin cures into a hard, plastic-like shell that makes the wood much more rigid and less prone to vibrating at specific frequencies.
Brother’s Warning: Do this in a well-ventilated area! Resin fumes are no joke, and you don’t want your car smelling like a chemical factory for a month.
Sound Deadening: Mats Inside the Box?
You’ve seen people put butyl rubber mats (like Dynamat or Noico) all over their cars, but should you put them inside the subwoofer box? The Verdict: Yes, but with a purpose. Applying deadening mats to the center of large, unbraced panels helps lower the “resonant frequency” of the wood. It won’t stop the box from flexing (only bracing does that), but it will stop the wood from “ringing” or making that hollow, knocking sound when the sub hits.
Airtight Integrity: The “Whistle” Vibration
Sometimes, what you think is a structural vibration is actually an air leak. At high power, air is forced out of tiny gaps in your seams at hundreds of miles per hour. This creates a high-pitched vibration or “whistle” that can be mistaken for a loose screw.
The Fix: Don’t just rely on glue. Use a high-quality silicone or polyurethane caulk on every single internal corner. Let it cure for 24 hours before you mount the sub. If you don’t, the chemicals from the wet silicone can actually eat the glue that holds your subwoofer’s spider and surround together. I’ve seen it happen—don’t be that guy.
Hardware: Bolts Over Screws
If your 12-inch sub weighs 30, 40, or 50 pounds, a standard wood screw isn’t enough to hold it during a 150dB bass hit. Vibration will slowly strip the wood fibers, and eventually, the sub will start to “leak” air around the frame.
The Pro Move: Use T-Nuts and Machine Bolts. T-nuts bite into the back of the wood, allowing you to bolt the sub down with extreme force. This creates a mechanical bond that won’t vibrate loose, no matter how hard you pound.
[Image: T-Nuts vs Wood Screws comparison diagram]
Gasketing: The Interface of Bass
The vibration often happens right where the metal frame of the sub meets the wood of the box. If this connection isn’t perfect, you get “frame chatter.” Always use a rubber or foam gasket between the sub and the baffle. Most high-end subs come with one, but if yours didn’t, a simple strip of weather-stripping from the hardware store will work wonders to decouple the metal from the wood.
The “Knuckle Test” for DIY Builders
When you think you’ve finished your bracing, use the Knuckle Test. Wrap your knuckles against the center of the box panels.
- If it sounds like a hollow “thud,” you need more bracing.
- If it sounds like hitting a solid brick or a thick piece of granite, you’ve nailed it. A non-vibrating box is a quiet box, and a quiet box means louder bass.
Fixing a Box You’ve Already Built
If you have a box that’s already vibrating and you don’t want to start over:
- Add external ribs: Glue and screw extra strips of MDF to the outside of the panels that are flexing.
- Threaded Rods: You can drill holes through the box and run a steel threaded rod from one side to the other, tightening it with nuts and washers on the outside. This is a common “save” for boxes that are ballooning.
Conclusion
Vibration is the enemy of performance. In a high-power system, your enclosure isn’t just a container; it’s a part of the acoustic engine. By doubling your baffles, using intelligent internal bracing, and ensuring an airtight, bolted-down seal, you ensure that every watt from your amplifier is converted into the physical pressure you crave. Build it once, build it heavy, and build it right. Your ears (and your retrovisors) will thank you.
5 Unique FAQs
1. Does internal bracing take up too much air volume? Yes, bracing occupies space. When calculating your box volume, you must account for the displacement of your braces. Most pro software (like WinISD) allows you to add this to your calculations so your tuning stays accurate.
2. Can I use spray foam inside the box to stop vibrations? Avoid this. Spray foam is mostly air and is not structurally rigid. It won’t stop a panel from flexing under the massive pressure of a 1000W sub. It’s also a mess to clean up.
3. Is Birch plywood better than MDF for preventing vibration? Birch is stiffer and lighter than MDF, which makes it great for preventing flex. However, it is more prone to “ringing” because it’s less dense. If you use Birch, you must use more bracing than you would with MDF.
4. Why does my port vibrate more than the rest of the box? The port is where air velocity is highest. If the walls of the port are thin (like 1/2″ MDF), they will vibrate like a reed in a wind instrument. Always build your ports out of the same 3/4″ material as the rest of the box.
5. How do I know if my box is flexing while I’m playing music? A simple trick is to place a glass of water on top of the box while it’s playing. If the surface of the water is jumping or creating ripples, the wood is flexing. In a perfectly rigid box, the water should stay relatively still even during heavy hits.