So, you just scored a “classic” 4-channel amplifier from a local listing. It’s heavy, it looks powerful, and it has that unmistakable “old-school” build quality. You’re ready to hook it up, but you want more than just 50 watts per channel. You want to bridge it to power that 12-inch subwoofer you have sitting in the garage.
Buying used gear is a great way to build a high-end system on a budget, but it comes with a catch: the manuals are usually long gone. Bridging is a powerful tool, but for an older amp, it’s like asking a retired athlete to run a marathon. It can do it, but you have to prepare it correctly.
What is Bridging? The “Super Channel” Concept
In a standard 4-channel amplifier, you have four separate “engines” (channels) pushing power to four speakers. Bridging is the electrical process of taking two of those engines and making them work together to push a single load.
When you bridge a pair of channels (like Channel 3 and Channel 4), you are essentially combining their voltage. Instead of each channel working against its own ground, one channel pushes the positive side of the sound wave while the other pulls the negative side.
The Result: You get significantly more power—mathematically, up to four times the power of a single channel, though in the real world of used gear, it’s usually closer to double or triple the output.
The Compatibility Audit: Can Your Used Amp Handle It?
Before you start wiring, you need to know if the amp was designed to be bridged. On modern amps, this is easy. On older, used gear, you have to be a detective.
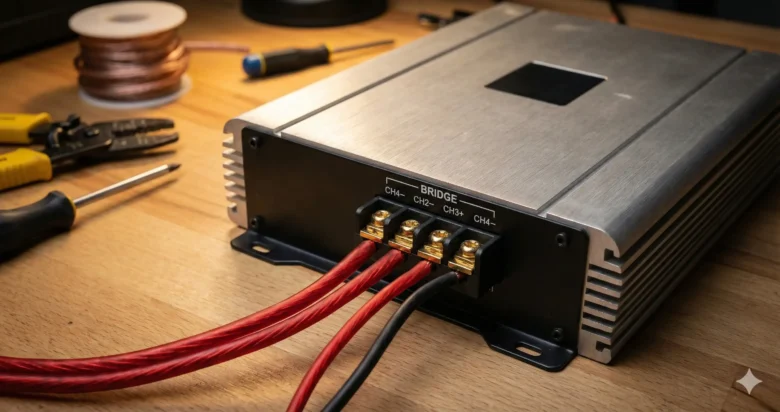
- Look at the Terminals: Look closely at the speaker output blocks. Often, there will be a line or a bracket printed under the screws with the word “BRIDGE” or “MONO.” It usually points to the Positive (+) of the left channel and the Negative (-) of the right channel.
- The Switch Test: Look for a small toggle switch labeled “2CH / 3CH / 4CH” or “Bridge Mode.” If your amp has this, it was built for the job.
- Search the Model Number: If the markings are rubbed off, Google the model number + “Manual.” If you can’t find the manual, look for forum posts from 10 years ago. If people are talking about “tri-mode” or “bridging the rear,” you’re likely safe.
Brother’s Warning: If the amp specifically says “Not Bridgeable” or “Minimum 4-Ohm per channel,” proceed with extreme caution. Older high-current amps might not have the protection circuits that modern amps have.
The Physics of the Bridge: Why it Works
To understand why your used amp gets so much louder when bridged, we have to look at the math. In car audio, power is calculated using this formula:
When you bridge an amplifier, you are effectively doubling the Voltage available to the speaker. Because the voltage is squared in the formula, doubling the voltage should quadruple the power. However, because older power supplies have internal resistance and heat losses, you usually see a jump from, say, 50W per channel to 150W or 200W when bridged.
The Golden Rule: The 4-Ohm Impedance Limit
This is the part where most used amplifiers meet their end in a cloud of smoke. Listen closely:
When you bridge two channels, each channel “sees” half of the load.
If you connect a 4-ohm subwoofer to a bridged pair of channels, each internal channel thinks it is playing into a 2-ohm load.
- Most used 4-channel amps are “2-ohm stable” per channel.
- Therefore, the minimum impedance for the bridge is 4 ohms.
The Disaster Scenario: If you have a used amp that is only “4-ohm stable” per channel and you try to bridge it into a 4-ohm sub, the amp will see 2 ohms. It will overheat, the capacitors will fail, or it will go into protect mode (if you’re lucky). Never try to bridge a used 4-channel amp into a 2-ohm subwoofer unless the manual specifically says it is “1-ohm stable per channel.”
Visual Inspection: Pre-Bridge Checkup
Since your gear is used, you don’t know its history. Bridging puts maximum stress on the internal components. Do these three things first:
- Check the Fuses: Ensure the fuses on the side of the amp match the manufacturer’s specs. If someone put a 40A fuse where a 20A should be, it’s a sign the amp was abused.
- The “Shake” Test: Give the amp a gentle shake. If you hear anything rattling inside (like a loose screw or a piece of solder), do not power it up.
- Terminal Corrosion: Used gear often has “crusty” terminals. Use a wire brush or some contact cleaner to ensure a perfect connection. A loose wire in bridge mode can cause a massive spark that fries the output transistors.
How to Wire the Bridge: The Step-by-Step
Most 4-channel amps use a specific wiring pattern for bridging. Let’s assume you are bridging the “Rear” channels (Channels 3 and 4).
- Identify the Terminals: You will see four screws: CH3 (+), CH3 (-), CH4 (+), and CH4 (-).
- Connect the Positive: Take the positive (+) wire from your subwoofer and connect it to the CH3 (+) terminal.
- Connect the Negative: Take the negative (-) wire from your subwoofer and connect it to the CH4 (-) terminal.
- Leave the rest: The CH3 (-) and CH4 (+) terminals will remain empty.
The 3-Channel Setup: The “Best of Both Worlds”
The most common way to use a used 4-channel amp is the “3-Channel Mode.” This is perfect for a budget SQ (Sound Quality) build.
- Channels 1 & 2: Power your front left and right door speakers (Standard mode).
- Channels 3 & 4: Bridged to power a single 4-ohm subwoofer.
This gives you clear vocals and high frequencies up front, with a powerful, dedicated “Super Channel” for your bass in the back.
Input Signal Management: Managing the “Y”
Older used amps are often “dumb.” They don’t know you are bridging them just by looking at the speaker wires. You have to tell them with the input signal.
- The Switch: Look for a switch that says “Input Mode.” Set it to 2CH if you are only using one pair of RCAs, or 4CH if you are using two pairs.
- The Y-Adapter: If your used amp doesn’t have an internal summing switch and you want to bridge Channels 3 and 4, you might need an RCA Y-adapter. This ensures that both channels receive the same signal. If CH3 gets a different signal than CH4 while bridged, the amp will struggle to sync the waves, leading to massive heat and distortion.
Heat & Thermal Management: Give It Air!
Used amplifiers often have dried-out thermal paste between the transistors and the heatsink. When you bridge the amp, it works harder and generates significantly more heat.
- Do not hide it: Don’t put a bridged used amp under a seat or in a tiny cubby without airflow.
- Mounting: Mount it vertically or on a flat surface where the fins can dissipate heat.
- The “Touch Test”: After 15 minutes of heavy play, touch the heatsink. If it’s so hot you can’t keep your hand on it for 3 seconds, you are pushing it too hard. Back off the gain or add a cooling fan.
Gain Matching: Protecting the Legacy
When you bridge an amp, the “Gain” or sensitivity setting becomes even more sensitive. Because you have double the voltage, you reach the “clipping point” much faster.
If you used to have the gain at 50% in 4-channel mode, you might only need it at 30% in bridge mode to reach full power. Always start with the gain at the minimum and slowly work your way up using the Multimeter Method we discussed in previous articles.
Conclusion: Respect the Gear
Bridging a used 4-channel amplifier is one of the most satisfying “hacks” in car audio. It allows you to take a piece of forgotten hardware and turn it into a powerhouse. However, it requires respect for the laws of physics. Keep your impedance at 4 ohms, manage your heat, and double-check your wiring.
When done correctly, that used amp will give you years of performance that rivals modern equipment costing five times as much. Treat it well, and it will return the favor with bone-shaking bass.
FAQs
1. Can I bridge only one channel? No. Bridging by definition requires two channels working together. You can, however, bridge Channels 3 & 4 while leaving Channels 1 & 2 in their normal, unbridged state.
2. My used amp has a “Mono” button. Is that the same as bridging? Not exactly. A “Mono” button usually just combines the left and right RCA signals into a single mono signal. You still have to do the physical “Bridge” wiring at the speaker terminals to get the extra power.
3. What happens if I bridge into a 2-ohm sub by mistake? The amp will pull too much current. It will likely get extremely hot very quickly and either blow a fuse or go into protection mode. If the amp is old and lacks protection, it could catch fire or melt the internal solder joints.
4. Can I bridge a 4-channel amp into two subwoofers? Yes. You can bridge Channels 1 & 2 for the first sub, and bridge Channels 3 & 4 for the second sub. Just remember that each sub must be 4 ohms.
5. Why does the “Protect” light flicker when the bass hits in bridge mode? This is a sign of Voltage Drop or Impedance Stress. Your bridged amp is asking for more current than your battery or wire can provide, or your subwoofer’s impedance is dipping too low. Check your ground wire and ensure it is thick enough for the new, higher power demand.