5 Beautiful Recipes · No Professional Skills Required · Stunning Visual Impact
Introduction
There is a particular kind of beauty that does not announce itself loudly. It does not compete for attention with clashing colors, competing textures, or overwhelming decoration. It simply exists — composed, intentional, quietly extraordinary. This is the beauty of monochromatic design, and when it is applied to the world of desserts, something genuinely remarkable happens. A dessert built entirely around a single color becomes less a recipe and more a statement — a visual philosophy expressed in sugar, cream, and imagination.
The concept is deceptively simple: choose one color — the creamy purity of all-white, the seductive depth of all-black chocolate, the romantic softness of blush pink — and commit to it completely, from every element of the dessert to every detail of the plate. The result is something that looks as if a professional pastry chef spent hours crafting it, yet can be achieved at home by any beginner willing to approach the kitchen with a little creativity and intention.
In this article, you will find five beautiful monochromatic dessert recipes — one for each of five distinct color stories — complete with presentation tips, make-ahead strategies, and the kind of finishing details that transform a home-made dessert into a conversation piece. No professional training required. Just the right recipe, the right intention, and the confidence to let simplicity do the heavy lifting.
The Philosophy of Monochromatic Desserts
Monochromatic design has been a cornerstone of fashion, interior design, and visual art for centuries. Its power comes from a counter-intuitive truth: constraint breeds creativity. When you remove the option of using multiple colors to create visual interest, you are forced to find that interest in other places — in texture, in height, in finish, in the interplay of matte and glossy surfaces, in the contrast between smooth cream and rough crumble. The result, when done well, has a refinement that busy, multi-colored presentations rarely achieve.
Applied to dessert-making, this philosophy becomes an extraordinary equalizer. You do not need piping skill, sugar-pulling technique, or a temperature-controlled kitchen to create a monochromatic dessert that stops people mid-conversation. You need a clear color vision, quality ingredients within your chosen palette, and an understanding of how to layer textures and heights to create visual complexity within simplicity.
The Three Principles of Monochromatic Plating
Before moving to the recipes, these three principles apply to every monochromatic dessert you will ever make:
- Vary your textures aggressively. When color cannot create contrast, texture must. A single-color dessert needs at least three distinct textures to feel visually complete — smooth, crunchy, and airy is the classic combination. Think a silky panna cotta against a fine almond crumble and a delicate foam, all in pure ivory. The eye reads this variation as depth, even without color difference.
- Play with finish and reflectivity. Matte and glossy surfaces within the same color create a subtle but powerful visual tension. A dark chocolate ganache poured over a matte brownie base, with a scatter of cocoa powder on one side — same color, completely different light behavior, and the result is hypnotic.
- Use height and negative space. A dessert placed slightly off-center on a wide plate, with deliberate empty space around it, looks infinitely more considered than one that fills the plate edge to edge. Height — a delicate tuile standing vertically, a quenelle of cream reaching upward — adds drama within constraint.
Recipe 1: The All-White Dessert — Vanilla Panna Cotta with White Peach Gel
Color Story: Ivory, Cream and Porcelain White
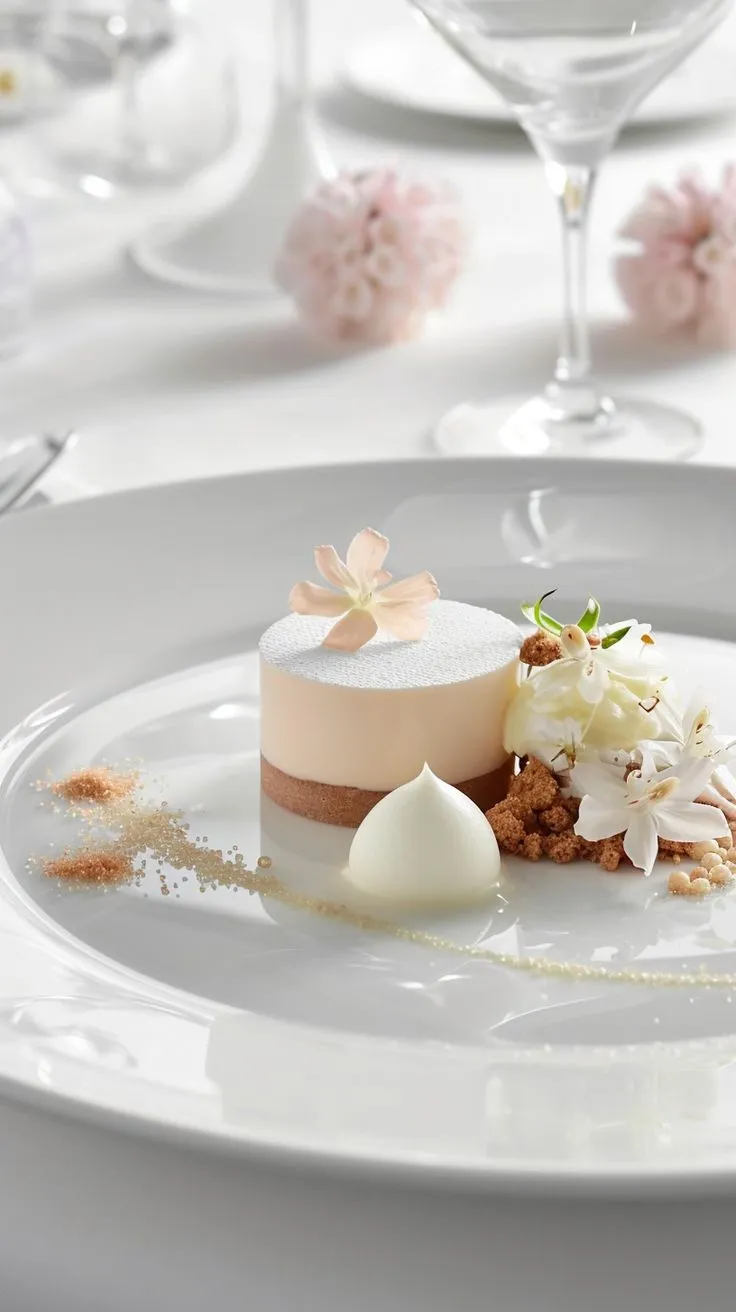
White is perhaps the most demanding monochromatic palette in dessert-making, for the same reason it is the most rewarding: there is nowhere to hide. Every element must be immaculate, every texture intentional, every surface thoughtfully finished. But when an all-white dessert is executed with care, it achieves a level of visual purity that is genuinely breathtaking — like a first fall of snow on a still morning.
This vanilla panna cotta with white peach gel layers three shades of ivory and three distinct textures into a dessert that looks as if it came directly from a Michelin-starred tasting menu.
Ingredients (serves 6)
For the panna cotta:
- 500ml heavy cream
- 50ml whole milk
- 60g caster sugar
- 1 vanilla bean, split and scraped (or 2 tsp pure vanilla extract)
- 2.5 sheets of leaf gelatine (or 1 sachet powder gelatine)
- Pinch of fine sea salt
For the white peach gel:
- 300ml white peach juice (clear, not cloudy)
- 1.5 sheets of leaf gelatine
- 1 tbsp caster sugar
- Few drops of lemon juice
To finish:
- Almond crumble (ground almonds, white sugar, butter — baked until just golden)
- White chocolate shavings or curls
- Edible white flowers (optional)
Method
Soak the gelatine leaves in cold water for 5 minutes. Heat the cream, milk, sugar, vanilla and salt in a saucepan over medium heat until just steaming — do not boil. Squeeze the gelatine dry and stir into the warm cream until completely dissolved. Strain through a fine sieve. Pour into lightly oiled individual moulds or glasses. Refrigerate for at least 4 hours until set.
For the gel, repeat the same process with the peach juice and gelatine. Once the panna cotta has fully set, pour a thin, even layer of the cooled (but still liquid) peach gel over each and return to the refrigerator for a further hour.
To serve, unmould each panna cotta onto a wide, flat plate. Place a small mound of almond crumble to one side. Scatter white chocolate curls across the top of the panna cotta. If using white flowers, position one at the edge of the crumble. The entire plate should read as a study in ivory — silky, crunchy, delicately floral.
Pro tip: The panna cotta and peach gel can be made the day before and kept covered in the refrigerator. Only add the crumble at the moment of serving — it will lose its texture within minutes of contact with the cream.
Recipe 2: The All-Black Dessert — Dark Chocolate Fondant with Activated Charcoal Ice Cream
Color Story: Midnight, Ebony and Deep Charcoal
An all-black dessert is one of the most visually dramatic things you can place in front of a guest. It is unexpected, slightly theatrical, and deeply sophisticated in a way that confounds expectation — because we are conditioned to associate darkness in food with bitterness or austerity, yet this dessert is intensely pleasurable in every sense. The darkness here is not a warning. It is an invitation.
Ingredients (serves 6)
For the dark chocolate fondant:
- 200g 85% dark chocolate, finely chopped
- 150g unsalted butter, plus extra for greasing
- 4 whole eggs + 4 yolks
- 150g caster sugar
- 80g all-purpose flour, sifted
- 30g black cocoa powder (alkalized, ultra-dark)
- 1 pinch of flaky sea salt
- Cocoa powder, for dusting ramekins
For the activated charcoal ice cream:
- 500ml good-quality vanilla ice cream (store-bought)
- 1 tsp food-grade activated charcoal powder
- 1 tsp cocoa powder
To finish:
- Black sesame brittle (black sesame seeds, sugar, baked thin)
- Black cocoa powder for dusting
- Squid ink tuile (optional — flour, squid ink, sugar, butter, baked paper-thin)
Method
For the charcoal ice cream: allow the store-bought ice cream to soften at room temperature for 10 minutes. Fold in the activated charcoal and cocoa powder until completely incorporated and uniformly black. Return to the freezer in a covered container for at least 2 hours.
For the fondant, follow the classic method: melt chocolate and butter together, cool slightly, whisk in eggs, yolks and sugar until light. Fold in the sifted flour, black cocoa and salt. Pour into prepared ramekins. Refrigerate for up to 24 hours. Bake at 220°C (425°F) for 10-12 minutes — edges set, center still molten. Rest 1 minute, unmould onto a black or very dark grey plate.
Dust the plate generously with black cocoa powder before plating. Place the fondant in the center. Quenelle a portion of the charcoal ice cream to one side. Stand a shard of black sesame brittle in the ice cream at an angle. If using the squid ink tuile, arch it over the fondant. Dust the entire composition once more with a whisper of black cocoa.
Pro tip: Serve on a matte black plate for the full monochromatic effect — the fondant and ice cream will appear to emerge from darkness itself. A white plate, by contrast, immediately breaks the color story. The plate is as much a part of the composition as the dessert.
Recipe 3: The Blush Pink Dessert — Rose and Raspberry Eton Mess Parfait
Color Story: Petal Pink, Blush Rose and Deep Berry
Pink in dessert carries a specific emotional weight — it is romantic, delicate, and festive all at once. A monochromatic pink dessert done with restraint and sophistication avoids the trap of feeling juvenile and instead arrives at something genuinely beautiful: the soft pink of rosewater cream against the deeper blush of raspberry ripple, with pale meringue shards catching light at different angles.
Ingredients (serves 6)
For the pink meringue shards:
- 3 egg whites
- 180g caster sugar
- 1/4 tsp cream of tartar
- 1 tsp freeze-dried raspberry powder (for color — add more for deeper pink)
- 1/2 tsp rosewater
For the rosewater cream:
- 400ml heavy cream, cold
- 2 tbsp icing sugar
- 1 tsp rosewater (not rose extract — more delicate)
- 1-2 drops natural pink food coloring (optional, for a deeper blush)
For the raspberry ripple:
- 200g fresh or frozen raspberries
- 3 tbsp caster sugar
- 1 tsp lemon juice
To finish:
- Fresh raspberries
- Dried edible rose petals
- Freeze-dried raspberry powder for dusting
Method
For the meringue: whip egg whites with cream of tartar to soft peaks. Add sugar gradually until stiff and glossy. Fold in the raspberry powder and rosewater gently — partial mixing creates a marbled pink effect. Spread thinly on a lined baking sheet and bake at 100°C (210°F) for 90 minutes. Cool completely, then break into dramatic irregular shards.
For the raspberry ripple: simmer raspberries, sugar and lemon juice for 8 minutes until reduced to a thick, glossy sauce. Cool completely.
Whip the cream with icing sugar and rosewater to generous, cloud-like peaks. Layer into tall glasses or shallow bowls: cream, a swirl of raspberry sauce, broken meringue shards, more cream, more sauce. Push several meringue shards in vertically for height. Scatter rose petals and a few fresh raspberries. Dust with freeze-dried raspberry powder through a fine sieve.
Pro tip: The meringue shards are the visual heart of this dessert. Vary the ratio of raspberry powder when folding — some parts pale blush, some deeper rose — for a naturally beautiful, non-uniform color that photographs magnificently.
Recipe 4: The Golden Dessert — Caramel Mille-Feuille with Honey Cream
Color Story: Amber, Honey Gold and Burnt Caramel
Gold in food communicates warmth, richness and abundance. A monochromatic golden dessert — built from the amber of caramel, the honey warmth of pastry cream, and the deep burnished tones of a properly caramelized sugar — has a luxuriousness that feels simultaneously autumnal and celebratory. This mille-feuille, with its shattering layers of golden puff pastry and silky caramel cream, is the most architecturally dramatic dessert on this list.
Ingredients (serves 6)
For the caramelized pastry layers:
- 1 sheet ready-rolled puff pastry
- 4 tbsp icing sugar (for caramelizing)
For the honey caramel cream:
- 400ml heavy cream, very cold
- 3 tbsp good-quality honey (acacia or wildflower)
- 1 tbsp icing sugar
- 1/2 tsp pure vanilla extract
- 2 tbsp store-bought salted caramel sauce (for swirling)
To finish:
- Extra caramel sauce for the plate
- Honeycomb pieces (store-bought or homemade)
- Gold leaf flakes (optional — spectacular effect)
- Flaky sea salt
Method
Unroll the puff pastry and cut into 18 equal rectangles. Place on lined baking sheets, dust generously with icing sugar and bake at 200°C (390°F) for 12 minutes. Remove, dust again with icing sugar and return to a higher shelf under the broiler for 2 to 3 minutes until the sugar caramelizes to a deep, glossy amber. Watch carefully — the difference between perfect and burnt is seconds. Cool completely on a wire rack.
Whip the cold cream with the honey, icing sugar and vanilla to firm, pillowy peaks. Gently ripple in the salted caramel with a spoon — a few gentle strokes only, to create a caramel marble effect rather than a uniform color.
Assemble just before serving: place a pastry rectangle on the plate, pipe or spoon a generous layer of honey cream, top with a second rectangle, more cream, then a final pastry layer. Drizzle the plate with caramel sauce in a slow, deliberate spiral. Place a piece of honeycomb to the side. Apply gold leaf with a dry brush if using. Finish with a pinch of flaky sea salt.
Pro tip: The caramelized pastry layers can be made up to 6 hours in advance and kept between sheets of parchment at room temperature. Assemble only at the moment of serving — mille-feuille loses its shattering crunch within 20 minutes of assembly. The drama of that first crack when a fork meets the pastry is half the dessert.
Recipe 5: The Green Dessert — Matcha and White Chocolate Tart
Color Story: Jade Matcha, Pistachio and Pale Celadon
Green is the most unexpected color in a dessert palette — and perhaps the most quietly stunning when handled with elegance. The deep, mineral green of ceremonial-grade matcha has a visual richness that is completely distinctive, while its flavor — earthy, slightly bitter, complex — creates the kind of contrast with sweet white chocolate that makes every bite interesting. This tart is the most sophisticated recipe on this list, and among the simplest to execute.
Ingredients (serves 8)
For the pistachio crust:
- 120g shelled pistachios (unsalted)
- 80g all-purpose flour
- 50g icing sugar
- 80g cold unsalted butter, cubed
- 1 egg yolk
- Pinch of fine sea salt
For the matcha and white chocolate ganache filling:
- 200g good-quality white chocolate, finely chopped
- 200ml heavy cream
- 2 tbsp ceremonial-grade matcha powder
- 2 tbsp hot (not boiling) water
- 1 tbsp unsalted butter
- Pinch of fine sea salt
To finish:
- Matcha powder for dusting (use a fine sieve)
- Roughly chopped pistachios scattered at one edge
- White chocolate curls
- Micro herbs or edible green flowers (optional)
Method
For the crust: pulse the pistachios in a food processor until finely ground. Add flour, icing sugar and salt, pulse to combine. Add cold butter and pulse to a breadcrumb texture. Add egg yolk and pulse until the dough just comes together. Press firmly into a 23cm tart tin, including the sides, to an even thickness. Refrigerate for 30 minutes. Blind bake at 180°C (350°F) for 15 minutes until golden-green and fragrant. Cool completely.
For the ganache: whisk the matcha into the hot water until completely smooth and lump-free — this step is critical, as undissolved matcha clumps will show in the finished tart. Heat the cream until just steaming, then pour over the chopped white chocolate. Leave for 2 minutes, then stir from the center outward until completely smooth. Stir in the matcha paste, butter and salt. The color should be a deep, vivid jade.
Pour the ganache into the cooled tart shell. Gently tap the tin on the counter to level the surface. Refrigerate for at least 3 hours until completely set. Just before serving, dust the entire surface with matcha through a fine sieve. Scatter a small cluster of pistachios at one edge. Add white chocolate curls across the opposite edge. The tart should read as a landscape in green — jade ganache, pistachio crust, white accents.
Pro tip: Quality of matcha matters enormously here, both for flavor and for color. Ceremonial-grade matcha has a deep, vivid jade color and a clean, complex flavor. Culinary-grade matcha tends toward a dull, muddy green and a more bitter, one-dimensional taste. For a dessert built entirely around this single ingredient, the investment in quality is essential.
The Monochromatic Plating Guide: Making Every Dessert Look Like Art
The techniques that follow apply to every dessert in this article and to every monochromatic dessert you will ever create. Apply them consistently and the results will always read as intentional, professional, and visually coherent.
- Choose your plate as deliberately as your ingredients. The plate is not a neutral background — it is an active part of the composition. For white desserts, a pale grey stone or linen-textured plate creates more visual interest than stark white. For dark chocolate, matte black is transformative. For pink, dusty rose ceramic feels completely different from candy pink plastic. The plate tells the first half of the story before anyone tastes a thing.
- Master the two-thirds rule. Place your main dessert element on one side of the plate, occupying roughly two thirds of the space. Use the remaining third for your secondary elements — a quenelle of cream, a scatter of crumble, a sauce pool. Empty space on a plate is not wasted — it is breathing room, and it makes everything around it look more important.
- Create a sauce pool with intention. Spoon your sauce onto the plate before positioning the dessert. Use the back of the spoon to sweep it in a deliberate arc rather than a centered puddle. Then place the dessert so it interrupts and overlaps the sauce edge — this creates a layered, painterly effect that looks designed rather than poured.
- Vary the heights within your color family. A dessert that is entirely flat reads as two-dimensional regardless of how beautiful the colors are. Push a shard of meringue vertically into cream. Stand a tuile at an angle. Stack pastry layers. Height creates shadow, and shadow creates depth, and depth creates the illusion of extraordinary effort where there was only thoughtful arrangement.
- Finish with a single focal point. Every plated dessert benefits from one element that draws the eye first — a single edible flower, a perfect quenelle, a dramatic shard of caramelized sugar. Identify your focal point before you begin plating and build everything else around it. One clear focal point is elegance. Three competing ones are confusion.
Common Mistakes in Monochromatic Desserts (and How to Avoid Them)
- Introducing an accidental color break. A single raspberry on an all-white dessert or a green herb on an all-black plate does not add freshness — it undermines the entire concept by revealing that the monochromatic choice was incomplete rather than deliberate. Audit every element before plating and eliminate anything that falls outside your color family. The discipline is the point.
- Choosing a color that does not translate to dessert ingredients. Vivid blue, for example, requires artificial coloring to achieve convincingly in dessert, and the effect rarely reads as elegant. The five colors in this article — white, black, pink, gold and green — are specifically chosen because they occur naturally in high-quality dessert ingredients. Work with color that the ingredients offer generously rather than fighting nature with dye.
- Neglecting texture variety within the palette. A monochromatic dessert that is entirely smooth, entirely crunchy, or entirely airy loses its visual dimension quickly. The compositions in this article each include at least three texture levels by design. When adapting these recipes or creating your own, always ask: where is the crunch, where is the cream, and where is the lightness?
- Over-garnishing in an attempt to add interest. More is not more in monochromatic plating. If a dessert looks unfinished, the answer is almost never to add more elements — it is usually to refine the placement and proportion of what is already there. A single perfectly positioned element is always more powerful than five competing ones.
- Forgetting that refrigeration affects color. Matcha ganache and raspberry cream both lose vibrancy over time in the refrigerator. Make garnishes and apply the final dust of matcha, raspberry powder or cocoa as close to serving as possible. Prepare components separately and assemble at the last moment to preserve both color intensity and textural contrast.
Conclusion
Monochromatic minimalism in dessert-making is, at its core, an exercise in confidence — the confidence to commit to a vision completely, to trust that simplicity done with intention is always more powerful than complexity done without it. The five desserts in this article represent five entirely different emotional registers: the serene purity of all-white, the compelling darkness of all-black, the romantic softness of blush pink, the warm abundance of gold, and the meditative sophistication of deep green. Each one achieves its visual impact not through complication, but through focus.
You do not need professional training to create desserts like these. You need quality ingredients, an understanding of texture contrast, a respect for restraint, and the willingness to treat plating as an act of composition rather than an afterthought. Every element on the plate is a choice. In monochromatic design, every choice is visible. That is exactly why, when every choice is made well, the result is extraordinary.
Choose your color. Build your palette of textures. Plate with intention. The most beautiful dessert you have ever served is waiting — and it begins with a single, deliberate choice.
Frequently Asked Questions
1. Can I combine two of these color stories in the same dinner?
Absolutely — in fact, serving two contrasting monochromatic desserts side by side, such as the all-white panna cotta and the all-black fondant, creates one of the most visually dramatic dessert presentations imaginable. The contrast between the two compositions amplifies the intentionality of each. Serve them simultaneously on a wide board or as two courses with a short pause between.
2. Which of these desserts is most suitable for complete beginners?
The blush pink Eton Mess parfait is the most forgiving — broken meringue and loosely layered cream are structurally very tolerant of variation and imprecision, and the nature of the dessert means that irregularity in the components actually contributes to rather than detracts from the visual. The white panna cotta comes a close second, as the moulding process is simple once you understand the gelatine ratios.
3. Where can I find food-grade activated charcoal for the black dessert?
Food-grade activated charcoal powder is available at health food stores, specialty baking suppliers, and online retailers. Ensure that any activated charcoal you purchase is specifically labeled as food-grade and intended for culinary use. Note that activated charcoal can interfere with the absorption of medications — if any of your guests are on prescription medicines, it is worth flagging the ingredient.
4. Can all of these desserts be made the day before a dinner party?
The panna cotta, charcoal ice cream, caramel sauce, raspberry ripple, pistachio tart crust, and matcha ganache can all be made the day before. The pink meringue shards should be made no more than 24 hours in advance and stored in an airtight container away from humidity. The mille-feuille pastry layers can be caramelized the morning of but should be assembled no more than 30 minutes before serving. Final garnishing and plating should always be done immediately before the dessert reaches the table.
5. What if I want to apply this monochromatic concept to a dessert not on this list?
The framework is simple: identify your color, source three to four ingredients that fall naturally within that color family, ensure you have at least three different textures represented, and apply the plating principles from the presentation guide. A monochromatic lemon tart in all shades of yellow, a coffee-and-caramel brown composition, or an all-purple dessert built around blackcurrant, lavender and blueberry are all natural extensions of this approach. The color is just the beginning — the creativity is entirely yours.