Introduction
There is a particular kind of magic that happens when a chilled dessert arrives at a dinner table. Something about the cold, the delicate trembling of a perfectly set panna cotta, the glossy surface of a no-bake tart that reflects the candlelight, the layers of a frozen parfait just beginning to soften at the edges — there is a quiet drama to these desserts that no warm cake or freshly baked cookie can quite replicate. They arrive composed and self-possessed, as if they have been waiting patiently in the cold for this exact moment.
Chilled desserts also carry a practical gift that no other dessert category offers so generously: they are almost always better made in advance. While the dinner party host is busy with the main course, the saute pans and the timing of the meal, the dessert is resting quietly in the refrigerator, deepening in flavor, setting to its ideal texture, completely unbothered and entirely ready. This make-ahead nature is not a shortcut. It is the correct way to make these desserts, and it produces results that genuinely improve with time.
The five recipes in this collection were chosen to represent the full range of what chilled desserts can be: the silky simplicity of a classic panna cotta, the layered drama of a semifreddo, the elegant restraint of a lemon posset, the crowd-pleasing richness of a no-bake cheesecake, and the ethereal lightness of a frozen mango and coconut parfait. Each one is completely achievable at home, each has been designed to look significantly more complex than it actually is, and each one carries that quality that all the best desserts share: it makes the people eating it feel genuinely taken care of.
Why Chilled Desserts Are the Secret Weapon of Every Great Host
Before the recipes, it is worth spending a moment understanding why chilled desserts occupy such an important position in the repertoire of elegant home cooking — and why they consistently outperform their warm counterparts in dinner party settings.
- They are genuinely better made ahead. Unlike a souffle that collapses if it waits, or a warm chocolate cake that loses its appeal at room temperature, chilled desserts actively improve with time in the refrigerator. Flavors meld, textures set, and the dessert you pull from the refrigerator three hours after making it is measurably better than the one you made one hour before.
- They require no last-minute heat or timing. The most stressful moment of any dinner party is the gap between the main course and dessert, when every guest is watching and the host is trying to do too many things at once. Chilled desserts eliminate this entirely. Open the refrigerator, plate, garnish, serve.
- They present beautifully with minimal effort. A panna cotta in a glass with a jewel-bright coulis, a semifreddo slice with chocolate shards, a lemon posset with candied zest — these are visually stunning presentations that require no pastry piping skills, no temperature-sensitive chocolate work, and no architectural assembly under pressure.
- The cold amplifies flavor contrast. Cold temperatures intensify the perception of sweetness and acidity simultaneously, which is why a chilled lemon posset tastes more vibrantly lemony than a warm lemon curd, and why a frozen mango parfait can be simultaneously sweet and sharp in a way that the same ingredients at room temperature simply cannot achieve.
- They are endlessly adaptable. Every recipe in this collection can be adapted to different dietary requirements, seasonal ingredients, and flavor preferences with minimal structural change. Once you understand the technique behind each, you have a template that will serve you for years.
The Five Enchanting Recipes at a Glance
| Recipe | Description |
| 1. Vanilla Rose Panna Cotta | Silky Italian cream set with rosewater and topped with a hibiscus jelly layer |
| 2. Dark Chocolate Semifreddo | Italian frozen mousse with espresso, toasted hazelnuts and chocolate shards |
| 3. Lemon Posset with Lavender | Three-ingredient British classic infused with lavender and candied zest |
| 4. Strawberry Basil No-Bake Cheesecake | Creamy no-bake tart with fresh basil in the filling and strawberry mirror glaze |
| 5. Mango and Coconut Frozen Parfait | Tropical layered frozen dessert with mango, coconut cream and lime |
🌸 Recipe 1: Vanilla Rose Panna Cotta with Hibiscus Jelly
The dessert that looks like a jewel and tastes like a dream
If there is one chilled dessert that consistently earns the most gasps when it arrives at the table, it is the panna cotta. The concept is almost absurdly simple — cream, sugar, gelatine, flavor — yet the result, when done with care, is one of the most elegant things that can come out of a home kitchen. This version layers a delicately rosewater-infused vanilla cream beneath a translucent crimson hibiscus jelly that sets to a perfect, trembling clarity. The color contrast alone is extraordinary.
The name panna cotta means cooked cream in Italian, and it comes from the Piedmont region in the north of Italy where it has been made for centuries. The genius of the recipe lies in the restraint of its ingredients — each one must be of good quality because there is nothing to hide behind. A mediocre vanilla extract will be immediately detectable. A good one will make the entire dessert sing.
Ingredients (serves 6):
For the vanilla rose panna cotta:
- 500ml heavy cream
- 80ml whole milk
- 70g caster sugar
- 1 vanilla bean, split and scraped (or 2 tsp pure vanilla extract)
- 1 tsp rosewater — use sparingly, it is potent
- 2.5 gelatine leaves (or 1 sachet of powder gelatine, about 7g)
- Pinch of fine sea salt
For the hibiscus jelly layer:
- 300ml hibiscus tea, brewed strong and cooled (or cranberry juice for a simpler option)
- 2 tbsp caster sugar
- 1.5 gelatine leaves (or just under 1 sachet powder gelatine)
- 1 tsp fresh lemon juice
To garnish:
- Dried edible rose petals
- Fresh raspberries or pomegranate seeds
- A few drops of rosewater in a small spray bottle (optional — for the table)
- Micro mint leaves
Method:
Begin with the panna cotta base. Soak the gelatine leaves in cold water for 5 minutes until completely softened. While they soak, combine the cream, milk, sugar, vanilla and salt in a saucepan over medium heat. Heat gently, stirring occasionally, until the mixture just begins to steam at the edges — small bubbles forming around the perimeter, not a rolling boil. Remove from heat. Squeeze the soaked gelatine leaves firmly to remove excess water, then add to the warm cream and stir until completely dissolved. Add the rosewater now, off the heat. Stir well and taste — the floral note should be present but gentle, not perfumed.
Strain the mixture through a fine sieve into a pouring jug. This removes the vanilla pod pieces and any gelatine residue and gives you a clean, smooth pour. Lightly oil six individual moulds, glasses, or ramekins with a neutral oil — just a brush of it, enough to allow later unmoulding without the cream sticking. Pour the panna cotta mixture in evenly, filling each mould about two-thirds full. Leave room for the jelly layer above. Refrigerate for at least 3 hours until set — the surface should be firm to a light touch but still have a gentle wobble at the center when the mould is carefully nudged.
For the hibiscus jelly: soak the remaining gelatine in cold water for 5 minutes. Heat the hibiscus tea with the sugar and lemon juice in a small pan until the sugar dissolves. Remove from heat, squeeze and add the gelatine, stir until dissolved. Allow to cool to room temperature — it must not be warm when poured over the set panna cotta, or it will dissolve the surface. Pour a thin, even layer over each set panna cotta. Return to the refrigerator for at least another hour, or overnight.
To serve: if unmoulding, run a thin knife around the edge of each mould, place a plate on top and invert with a confident, decisive movement. If serving in glasses, no unmoulding needed — simply garnish the top of the jelly layer directly. Scatter dried rose petals and fresh raspberries or pomegranate seeds over and around each dessert.
Pro tip: The secret to a perfectly set panna cotta that unmoulds cleanly is the ratio of gelatine to cream. Too much gelatine and it becomes rubbery; too little and it collapses. The quantities above produce a panna cotta that holds its shape but still trembles when touched, which is the ideal. Make the day before the dinner party for the best flavor development and the most reliable set.
Visual note: The crimson jelly against the ivory cream creates one of the most naturally beautiful color contrasts in all of dessert-making. For even more drama, serve the panna cotta in crystal-clear glasses and bring them to the table on a tray lined with fresh rose petals.
🍫 Recipe 2: Dark Chocolate Espresso Semifreddo with Hazelnut Praline
The frozen dessert that feels like eating a cloud made of dark chocolate
Semifreddo is one of Italy’s most ingenious contributions to the world of dessert. The word means half cold, which is precisely what it is: not quite ice cream, not quite mousse, but something in between that is arguably better than both. It has the creaminess and depth of a parfait with the airy lightness of a chocolate mousse, and it holds its beautiful shape when sliced, revealing perfect layers and a texture that melts on the tongue almost immediately.
This version is intensely chocolatey, with a shot of espresso folded through the base that amplifies the bitterness of the 70% dark chocolate in a way that is deeply sophisticated without being harsh. The hazelnut praline crumbled over the top adds crunch, color, and a nutty caramel note that ties everything together perfectly. It is the kind of dessert that makes people very quiet in a very good way.
Ingredients (serves 8):
For the semifreddo:
- 200g dark chocolate (70% cocoa solids), finely chopped
- 6 eggs, yolks and whites separated
- 120g caster sugar, divided into two equal portions
- 1 shot of espresso, cooled (about 30ml)
- 300ml heavy cream, very cold
- 1 tsp pure vanilla extract
- Pinch of fine sea salt
For the hazelnut praline:
- 150g blanched hazelnuts
- 150g caster sugar
- 3 tbsp water
- Pinch of sea salt
To finish and serve:
- Dark chocolate shards or curls — made by drawing a vegetable peeler along a cold block of dark chocolate
- Unsweetened cocoa powder for dusting
- Flaky sea salt
- A few whole hazelnuts, for decoration
Method:
Line a 900g loaf tin with two layers of plastic wrap, leaving generous overhang on all sides. This is important — the overhang is what you will use to lift the semifreddo out cleanly when frozen.
Melt the chocolate gently over a bain-marie, stirring until completely smooth. Add the cooled espresso shot and stir to incorporate. Set aside to cool to room temperature — the chocolate must not be warm when it meets the eggs, or it will scramble them.
In a large bowl, whisk the egg yolks with half the sugar until the mixture becomes very pale, thick, and nearly doubled in volume — at least 4 minutes with an electric mixer. This aeration is the structural backbone of the semifreddo. Fold the cooled chocolate mixture into the yolk base in three gentle additions, working carefully to retain as much air as possible.
In a separate clean bowl with clean beaters, whip the cold heavy cream with the vanilla to soft, billowing peaks — it should hold its shape but still look silky and generous, not grainy or stiff. In a third bowl, whip the egg whites with the salt to soft peaks, then add the remaining sugar gradually and continue to firm, glossy peaks.
Now fold everything together in this order: fold the whipped cream into the chocolate base in two additions. Then fold in the egg whites in three additions, each one with the lightest possible hand. The finished mixture should be homogeneous, airy and deeply dark. Pour into the prepared loaf tin, smooth the surface gently, cover the top with the plastic wrap overhang and freeze for a minimum of 6 hours — overnight is ideal.
For the hazelnut praline: toast the hazelnuts in a dry pan until lightly golden and fragrant. Spread on a lined baking sheet. In a small heavy-bottomed saucepan, combine the sugar and water over medium heat without stirring until the syrup turns a deep amber caramel. Pour immediately over the hazelnuts. Sprinkle with sea salt. Leave to set completely, then break into irregular shards and pieces.
To serve: remove the semifreddo from the freezer 8 to 10 minutes before serving to allow it to soften slightly — it should slice cleanly but not be rock-hard. Lift out using the plastic wrap overhang. Slice with a warm knife, wiping clean between cuts. Plate each slice, dust with cocoa powder, scatter hazelnut praline pieces, add chocolate shards and finish with a whisper of flaky sea salt.
Pro tip: The semifreddo can be made up to 3 days in advance and kept in the freezer, tightly wrapped. The praline keeps in an airtight container at room temperature for up to one week. Do not refrigerate the praline as humidity softens it. Together, this dessert has almost no day-of preparation — simply slice, dust and scatter.
Visual note: The cross-section of a perfectly made semifreddo slice is a study in deep, velvety darkness contrasted against the amber shards of praline and the white flecks of flaky salt. Serve on a dark plate for maximum visual impact, or on pale marble for a more dramatic contrast.
🍋 Recipe 3: Lemon and Lavender Posset with Candied Zest
The three-ingredient miracle that sets without gelatine and tastes like summer
The lemon posset is the great quiet secret of British dessert-making. It uses exactly three main ingredients — cream, sugar and lemon juice — and requires no gelatine, no baking and no technical skill whatsoever. It sets entirely through the natural chemical reaction between the acidity of the lemon juice and the proteins in the heavy cream, which is one of those moments when kitchen science and deliciousness align so perfectly that it feels like a small miracle.
The lavender infusion in this version adds a floral dimension that lifts the posset from a simple cream dessert into something genuinely enchanting — earthy, slightly herbal, profoundly calming. The candied lemon zest on top provides both the visual element this simple dessert needs and a chewy, concentrated citrus hit that contrasts brilliantly with the cool creaminess beneath.
Ingredients (serves 6):
For the lemon lavender posset:
- 600ml heavy cream
- 150g caster sugar
- Juice of 3 large lemons (about 100ml — measure this carefully)
- Zest of 2 lemons
- 1 tbsp dried culinary lavender (food-grade — not decorative)
- Pinch of fine sea salt
For the candied lemon zest:
- Zest of 2 lemons, removed in thin strips with a vegetable peeler
- 100g caster sugar
- 100ml water
- Extra sugar for coating
To serve:
- Fresh blueberries or raspberries
- Tiny fresh lavender sprigs (optional)
- Thin almond tuile or shortbread finger alongside (optional)
- Icing sugar for a final dusting
Method:
Begin by infusing the cream with the lavender. Combine the cream, sugar and dried lavender in a medium saucepan. Heat over medium heat, stirring occasionally, until the sugar is completely dissolved and the cream just begins to simmer around the edges. Remove from heat and leave to steep for 10 minutes — taste after 5 minutes and decide if you want more or less lavender intensity. When happy with the flavor, strain through a fine sieve, pressing the lavender gently to extract maximum flavor without bitterness.
Return the infused cream to the saucepan and bring back to a gentle simmer. Add the lemon zest and stir. Now add the lemon juice — measure it carefully, as this is the critical element. Too little and the posset will not set; too much and it will curdle rather than set smoothly. Pour the juice in a steady stream while stirring constantly. The mixture may thicken slightly as the acid hits the cream proteins — this is exactly what you want to see.
Pour through a fine sieve into a pouring jug. Divide evenly among six serving glasses, ramekins or small bowls. Leave to cool at room temperature for 20 minutes, then refrigerate for at least 4 hours, or overnight. The posset is set when the surface is firm to a gentle touch and does not run when the glass is tilted.
For the candied zest: remove the zest from the lemons in long strips using a vegetable peeler or sharp paring knife, avoiding as much of the white pith as possible. Blanch the strips in boiling water for 1 minute, drain, and repeat twice more — this removes bitterness. Make a simple syrup with the sugar and water, add the zest strips and simmer for 20 minutes until translucent and tender. Remove with tongs and toss in extra sugar while still warm. Lay on a lined baking sheet and leave to dry at room temperature for at least 1 hour.
To serve: place a small cluster of fresh blueberries or raspberries at the edge of each posset. Arrange two or three candied zest strips in an arc across the berries. If using lavender sprigs, add one per serving. Dust very lightly with icing sugar through a fine sieve.
Pro tip: The posset can be made up to 2 days in advance — it keeps beautifully in the refrigerator. The candied zest also improves with time, becoming firmer and glossier as it dries. The combination of lemon acidity, lavender floral notes and the sweet-sharp crunch of candied peel is a genuinely special flavor combination that feels far more complex than the recipe suggests.
Visual note: The pale ivory-cream surface of the posset against the vivid purple of blueberries and the glossy amber of the candied peel creates a naturally beautiful color palette. Serve in crystal-clear glasses to show the clean, white set of the posset within.
🍓 Recipe 4: Strawberry Basil No-Bake Cheesecake with Mirror Glaze
The unexpected herb twist that turns a beloved classic into something genuinely new
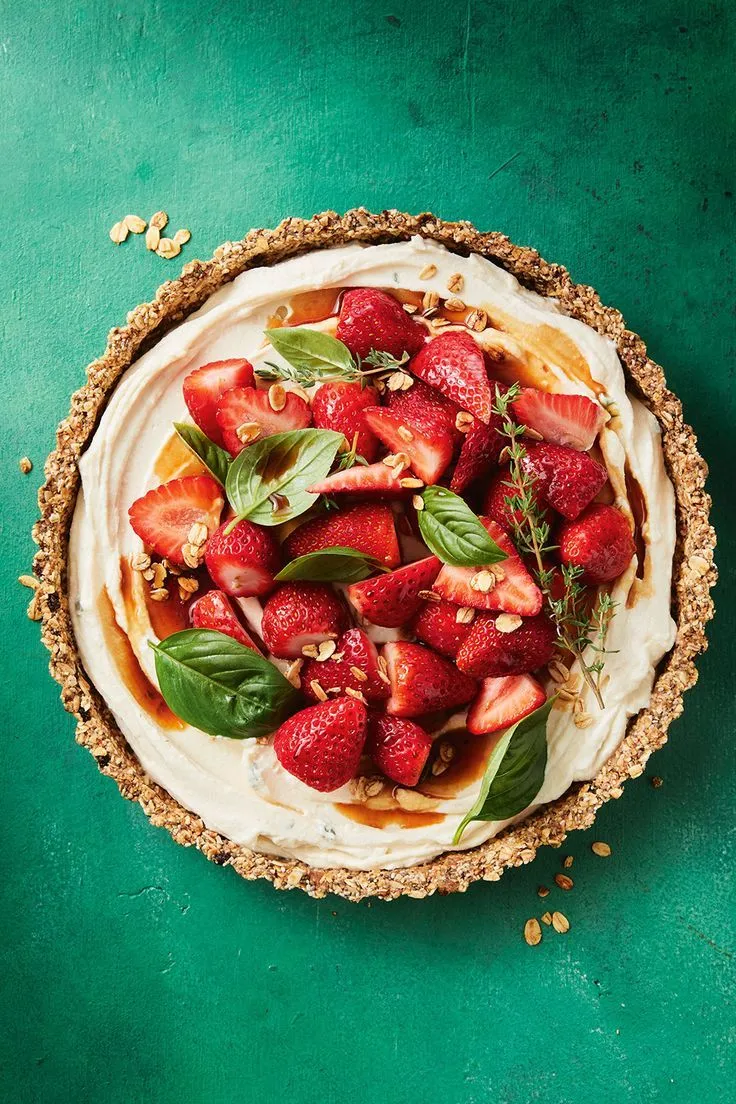
No-bake cheesecake sits at the intersection of crowd-pleasing accessibility and genuine sophistication. It requires no oven, no bain-marie, no careful temperature monitoring. Yet when it is sliced and its layers revealed — the sandy biscuit crust, the thick ivory cream, the glossy strawberry mirror glaze on top — it looks as though considerable skill was involved. The answer is simply patience and refrigeration, which are two things every home cook has access to equally.
The basil in this recipe is the detail that surprises everyone. Fresh basil folded through the cream filling adds a green, slightly peppery herbaceous note that cuts through the richness of the cream cheese and makes the strawberry glaze taste more vividly of strawberry by contrast. It sounds unusual. It tastes transformative. Do not skip it.
Ingredients (serves 10 to 12):
For the biscuit base:
- 280g digestive biscuits or graham crackers, finely crushed
- 100g unsalted butter, melted
- 2 tbsp caster sugar
- Pinch of fine sea salt
For the basil cream filling:
- 500g full-fat cream cheese, room temperature — this is critical for a smooth result
- 100g icing sugar, sifted
- 1 tsp pure vanilla extract
- Zest of 1 lemon
- 1 tbsp fresh lemon juice
- 300ml heavy cream, very cold
- 12 to 15 large fresh basil leaves, very finely chopped
For the strawberry mirror glaze:
- 400g fresh strawberries, hulled and quartered
- 80g caster sugar
- 2 tbsp fresh lemon juice
- 2 gelatine leaves (or 1 tsp powder gelatine)
To decorate:
- Fresh whole strawberries
- Small fresh basil leaves
- Edible gold leaf flakes (optional but spectacular)
- Freeze-dried strawberry powder for dusting
Method:
For the base: combine the crushed biscuits with the melted butter, sugar and salt until the mixture resembles damp sand that clumps firmly when pressed. Transfer to a 23cm springform pan and press firmly and evenly across the base and about 2cm up the sides — use the flat base of a glass or measuring cup for the most even, professional-looking result. Refrigerate for 30 minutes until firm.
For the filling: beat the cream cheese with the icing sugar, vanilla, lemon zest and juice until completely smooth and lump-free. This is easier when the cream cheese is genuinely at room temperature — cold cream cheese will leave lumps that cannot be beaten out. In a separate bowl, whip the cold heavy cream to firm, pillowy peaks. Fold the whipped cream into the cream cheese base in three additions, working gently to maintain volume. Fold in the finely chopped basil last — distribute it evenly throughout the mixture. Spread over the chilled biscuit base, smoothing the surface with a palette knife dipped in hot water. Refrigerate for at least 4 hours, or overnight.
For the strawberry mirror glaze: blend the strawberries with the sugar and lemon juice until completely smooth. Pass through a fine sieve, pressing firmly — you want a clear, seed-free puree. Soak the gelatine in cold water for 5 minutes. Heat 3 tablespoons of the strawberry puree in a small pan until warm (not boiling), add the squeezed gelatine and stir until dissolved. Stir back into the remaining puree. Leave to cool at room temperature, stirring occasionally, until the glaze reaches a consistency like thick maple syrup — it should coat the back of a spoon but still flow. Pour gently over the set cheesecake in a single, confident pour, tilting the pan slightly to encourage it to reach the edges evenly. Return to the refrigerator for 1 hour.
To serve: remove the springform ring carefully. Use a thin knife dipped in hot water to clean the edges if needed. Transfer to a serving plate. Arrange a cluster of whole fresh strawberries at one edge. Place a few small basil leaves among the strawberries. If using gold leaf, apply small pieces with a dry brush across the glaze. Dust the plate (not the cheesecake) lightly with freeze-dried strawberry powder for a professional frame.
Pro tip: The mirror glaze is the most technically sensitive part of this recipe, and the key is temperature. Too warm and it will melt the cream filling surface; too cool and it will set before it can spread. The sweet spot is when it coats a spoon but drips off in about 2 seconds. If it sets too quickly, gently warm the bowl over hot water and stir. Never rush this step.
Visual note: The combination of the deep crimson mirror glaze, the white cream visible at the cut edges, the sandy biscuit base, and the vivid green of the fresh basil leaves creates one of the most visually complete dessert presentations in this collection. Every component contributes color and this is a dessert that rewards being sliced at the table so everyone can witness the cross-section.
🥭 Recipe 5: Mango and Coconut Frozen Parfait with Lime and Chilli
The tropical showstopper that makes everyone feel like summer arrived at the table
A frozen parfait is one of the most forgiving and versatile frozen desserts in existence. Unlike ice cream, it requires no churning, no ice cream machine, and no monitoring. It is assembled in a loaf tin, frozen overnight, sliced and served — and the result is a layered, visually extraordinary dessert that holds its shape beautifully at the table while maintaining that perfect, creamy-cold texture that makes frozen desserts so irresistible.
This mango and coconut version is the most vibrantly colored dessert in the collection. The deep, sunset-orange of the mango layer against the pure white of the coconut cream creates a visual that is genuinely striking, and the addition of lime zest throughout both layers and a whisper of chilli in the mango layer adds complexity and brightness that elevates this from a tropical-themed treat to a genuinely sophisticated dessert experience.
Ingredients (serves 8 to 10):
For the mango layer:
- 400g fresh or frozen mango pulp (about 2 large ripe mangoes, blended smooth)
- 3 tbsp icing sugar — adjust depending on the sweetness of your mango
- Zest and juice of 1 large lime
- A small pinch of cayenne pepper or mild chilli flakes — optional but extraordinary
- 200ml heavy cream, cold
For the coconut cream layer:
- 400ml full-fat coconut cream, refrigerated overnight so it separates
- 3 tbsp icing sugar
- 1 tsp pure vanilla extract
- Zest of 1 lime
- 200ml heavy cream, cold
For the mango and lime coulis:
- 200g fresh mango, blended with 1 tbsp icing sugar and juice of half a lime
- Passed through a fine sieve for a smooth, glossy sauce
To garnish:
- Fresh mango slices
- Toasted coconut flakes
- Thin slices of red chilli (for the daring — just one or two, purely decorative)
- Lime zest and fresh mint leaves
- Edible flowers in orange and yellow tones
Method:
Line a 900g to 1kg loaf tin with two generous layers of plastic wrap, leaving significant overhang on all four sides. Set in the freezer while you prepare the layers.
For the mango layer: whip the 200ml heavy cream to soft peaks. In a separate bowl, stir together the mango pulp, icing sugar, lime juice and zest, and the pinch of cayenne if using. Taste and adjust — the mixture should be sweet, sharp and very slightly warm from the chilli, a warmth that intensifies beautifully when the parfait is frozen. Fold the whipped cream into the mango mixture in two additions. Pour into the frozen loaf tin, spreading evenly and smoothly. Return to the freezer for 90 minutes until just set — it should be firm at the surface but not solid all the way through.
For the coconut layer: open the refrigerated can of coconut cream and scoop out only the thick, solid cream from the top — not the watery liquid beneath. Whip this solid coconut cream with the icing sugar and vanilla until it reaches soft peaks. Whip the remaining 200ml heavy cream separately to soft peaks. Fold together gently, adding the lime zest. Spoon over the mango layer carefully, spreading to a smooth, even surface. Cover with the plastic wrap overhang and freeze for at least 6 hours, or overnight.
To serve: remove the parfait from the freezer 10 minutes before serving. Lift out using the plastic wrap overhang and unwrap. Place on a chilled serving plate or board. Slice with a hot knife, wiping clean between cuts. Spoon a pool of mango coulis to one side of each plate, place a parfait slice in the center, add fresh mango slices, toasted coconut flakes, a curl of lime zest, a few mint leaves, and the edible flowers if using. If including chilli slices as decoration, add one small piece to the top of each slice.
Pro tip: The key to clean layers in a parfait is ensuring each layer is properly set before adding the next — if the first layer is not set, the two will bleed into each other and lose that clean visual distinction. The 90-minute freeze between layers is not optional. The chilli in the mango layer is entirely optional but worth trying at least once — the contrast between frozen cold and gentle heat is genuinely fascinating and makes this dessert completely unforgettable.
Visual note: The cross-section of this parfait — deep orange mango below, pure white coconut above — is one of the most naturally beautiful slices you will serve at any dinner table. Present it on a white or pale stone plate and let the colors speak for themselves. The mango coulis pooled alongside adds a glossy, flowing quality that completes the composition.
The Art of Presenting Chilled Desserts: Making Every Plate Extraordinary
The recipes in this collection are beautiful on their own. The techniques that follow make them extraordinary. Apply any three of them consistently and the visual quality of your chilled desserts will reach a level that most home cooks simply never achieve.
- Chill your serving plates. This is the single most overlooked detail in home dessert service and possibly the most impactful. A cold plate keeps a chilled dessert at its ideal temperature from the moment it is plated until it reaches the guest, which means the panna cotta arrives perfectly trembling rather than beginning to weep at the edges. Place plates in the freezer for 10 minutes before plating.
- Work with contrast in every element. Color contrast (dark chocolate against white cream), temperature contrast (frozen parfait against warm coulis), and texture contrast (silky posset against crisp candied zest) — every plate should have at least two forms of contrast working simultaneously. Contrast is what makes a plate interesting rather than merely pretty.
- Create intentional negative space. Place the dessert element slightly off-center. Use the empty space on the plate to hold a coulis pool, a scatter of fresh fruit, or a dusting of powder. Empty plate space is not waste — it is breathing room, and it makes everything placed within it look more deliberate and important.
- Use a warm knife for every cold dessert cut. Run a sharp knife under hot water, dry it quickly, and cut in one smooth, confident stroke. Wipe and reheat between every cut. This single technique is the difference between a clean, restaurant-quality slice and a jagged, collapsed edge.
- Apply finishing touches at the last possible moment. Fresh herbs wilt, freeze-dried powders absorb moisture and lose their color, whipped cream deflates, and edible flowers bruise. Do all garnishing within 5 to 10 minutes of serving, no earlier.
- Match the plate to the dessert palette. A white plate makes dark chocolate more dramatic. A dark slate makes an ivory panna cotta luminous. A pale grey stone complements the pastels of a mango parfait. The plate is the first visual decision the guest makes about the dessert before tasting it — make it an intentional one.
Complete Make-Ahead Timeline
One of the greatest advantages of this entire collection is that every recipe is designed to be made in advance. Here is the complete guide:
| Recipe | Make-Ahead Window |
| Vanilla Rose Panna Cotta | Up to 2 days in advance — refrigerate, add garnish on day of serving |
| Dark Chocolate Semifreddo | Up to 3 days in advance — freeze wrapped; praline 1 week ahead |
| Lemon Lavender Posset | Up to 2 days in advance — refrigerate; candied zest 1 week ahead |
| Strawberry Basil Cheesecake | Up to 2 days in advance — refrigerate; glaze day before or day of |
| Mango Coconut Parfait | Up to 3 days in advance — keep frozen; coulis 2 days ahead |
Common Mistakes with Chilled Desserts and How to Avoid Every One of Them
Even the best recipes can be undermined by a handful of predictable, avoidable errors. Here are the ones that appear most frequently with chilled desserts, and exactly how to sidestep them:
- Not blooming gelatine properly. Powdered gelatine must be sprinkled over cold water and left for at least 5 minutes before heating. Leaf gelatine must be soaked in cold water until completely pliable. Underbloomed gelatine creates lumps and uneven setting. Always bloom completely before dissolving.
- Adding gelatine to boiling liquid. Gelatine is denatured by high heat, losing its setting power. Always add it to liquid that is warm but not boiling — 70 to 80 degrees C is ideal. If your cream comes to a full boil, remove from heat and let it cool for 2 minutes before adding the gelatine.
- Using cold cream cheese. Cold cream cheese will not beat smooth, no matter how long you work it. Room temperature cream cheese incorporates evenly, lump-free, in under 2 minutes. Take it out of the refrigerator at least 1 hour before using.
- Over-whipping the cream. Whipped cream that has gone too far becomes grainy and, if folded into a mousse or parfait, produces a slightly curdled, heavy texture. Stop whipping the moment the cream holds soft, pillowy peaks and looks silky rather than stiff.
- Rushing the freezing time. Frozen desserts require the full time specified in the recipe. Under-frozen parfait collapses when sliced. Under-frozen semifreddo cannot be sliced cleanly. The freezer time is not advisory — it is structural.
- Over-infusing aromatics like lavender or rosewater. Both lavender and rosewater become unpleasantly soapy and medicinal if used in excess. Taste your infusion after 5 minutes of steeping and stop there if the flavor is present. More is not more with these ingredients.
- Forgetting to remove from the freezer before serving. Frozen desserts served straight from the freezer are too hard and cold to be pleasurable. The semifreddo and parfait both need 8 to 10 minutes at room temperature before slicing. Set a timer when you remove them.
Conclusion
The five desserts in this collection represent something more than a set of recipes. They represent a philosophy of dessert-making that values patience over complexity, intention over busyness, and quiet elegance over theatrical effort. The panna cotta that trembles when touched. The semifreddo that releases a cold mist when sliced. The posset that sets to a perfect, silent cream. The cheesecake that reveals its crimson mirror glaze as it is brought to the table. The parfait with its sunset layers of orange and white. Each of these desserts has a moment — a specific instant when it produces exactly the reaction that all great food aims to produce: a brief, involuntary pause, followed by genuine pleasure.
None of them require professional training. All of them require care. And the care, in each case, is almost entirely applied in advance, in a quiet kitchen, before the guests arrive, before the table is set, before the evening begins. That is the final gift of the chilled dessert: it is made with love when you have the time to give it, and it delivers that love precisely when it is most appreciated.
Choose the recipe that excites you most. Make it the day before. Then show up to your own dinner party and enjoy every course, knowing that the most enchanting moment of the evening is already waiting, perfectly composed, somewhere just behind the refrigerator door.
Frequently Asked Questions
1. Can I make all five of these desserts for the same dinner party?
You can, and it would be a breathtaking dessert table. If attempting all five, the practical approach is to stagger the making over three days: mango parfait and semifreddo on day one (both freeze well for 3 days), panna cotta and posset on day two, cheesecake and its glaze on the day before or morning of the event. Keep all garnishes prepared but separate, applying them only at the moment of serving.
2. Which of these recipes is most suitable for a completely dairy-free diet?
The mango and coconut parfait is the easiest to make fully dairy-free, as coconut cream is already the base and the heavy cream portions can be replaced with full-fat coconut cream without significant structural change. The lemon posset, which is built entirely on the chemistry of heavy cream, cannot currently be replicated with plant-based cream, as the protein interaction that causes it to set is specific to dairy. The semifreddo and panna cotta can be adapted with coconut cream with some texture differences.
3. My panna cotta did not set. What went wrong and can it be saved?
A panna cotta that fails to set is almost always a gelatine issue — either the gelatine was not properly bloomed before dissolving, it was added to liquid that was too hot and lost its setting power, or the quantity was slightly off. It cannot be saved once the cream has set in the mould. However, the base can be re-melted, more gelatine added (dissolved in a small amount of warm cream first), and the mixture reset. This works well if caught early. As a prevention, always use the gelatine quantity specified, always bloom fully, and always add to warm, not boiling, cream.
4. Can I substitute dried lavender with fresh lavender in the posset?
Fresh culinary lavender can be used but requires different handling. Fresh lavender is less concentrated than dried, so double the quantity and reduce steeping time to 3 to 4 minutes, as fresh lavender can turn slightly bitter with extended contact. Always use culinary lavender, never ornamental or decorative lavender, which is treated with chemicals unsuitable for consumption. If neither is available, lavender extract can be substituted at a rate of 2 to 3 drops per recipe — taste as you go, as extracts vary considerably in strength.
5. How do I transport these desserts if I am making them for someone else’s dinner party?
The panna cotta travels best in the moulds, covered with plastic wrap, and unmoulded on arrival. The posset travels well in its serving glasses, covered. The cheesecake should remain in its springform ring until serving. The semifreddo and parfait should be transported frozen, wrapped tightly, in a cooler with ice packs, and allowed to rest 8 minutes at the destination before slicing. For all five, add garnishes only after arrival, never before transport. The fragility of the chilled dessert at the table is precisely what makes it so beautiful — treat it accordingly.